Your Everest Base Camp guide starts here: tips, expectations, and what it’s really like on the trail—read my blog before you take on this legendary trek!
Disclaimer: All views expressed on this blog are my own based on my own experiences and do not represent of any entity with which I have been, are now or will be affiliated
May 12, 2025
Batangas, Philippines
Hike Dates: April 6–19
April 18: Flight from Lukla to Kathmandu
April 19: Rest day in Kathmandu
Nepal Travel Guide here
Ever since I was young, I’ve dreamed of seeing the Himalayas. I used to watch them on the National Geographic Channel, amazed by their size and beauty. They looked so far away, so unreal—like something out of a storybook. But deep down, I knew that one day I wanted to be there, to see them with my own eyes.
Last year I stood on top of three of Asia’s highest mountains (Mt. Kinabalu. Mt. Fuji. Mt. Yushan). Each one taught me something. Each one made me want to go higher. So I did.
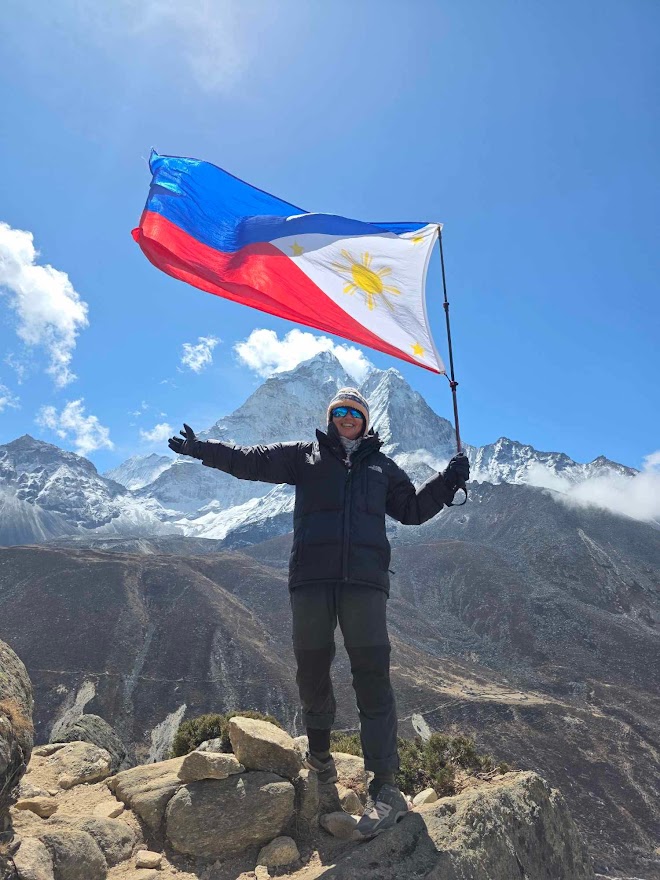
Everest Base Camp — 17,598 feet. The closest most people will ever get to the tallest mountain on Earth. Not a casual decision. A deliberate one.
I didn’t go because it was next on a list.
I went because I needed to know what I was made of at altitude.
The trek itself was both tough and incredible. Base Camp is located at 17,598 feet (5,364 meters), and getting there meant hiking for days through rugged trails, steep climbs, and freezing cold weather. But the views were absolutely worth it—snowy peaks, hanging glaciers, suspension bridges, and peaceful mountain villages.
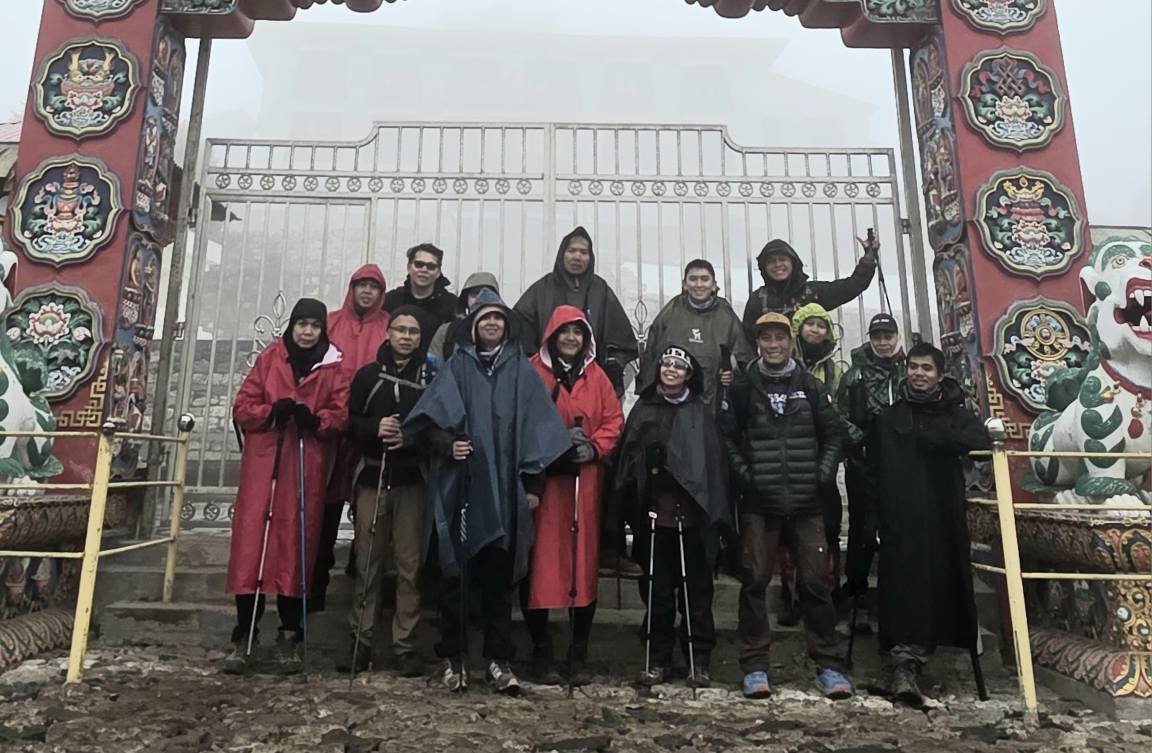
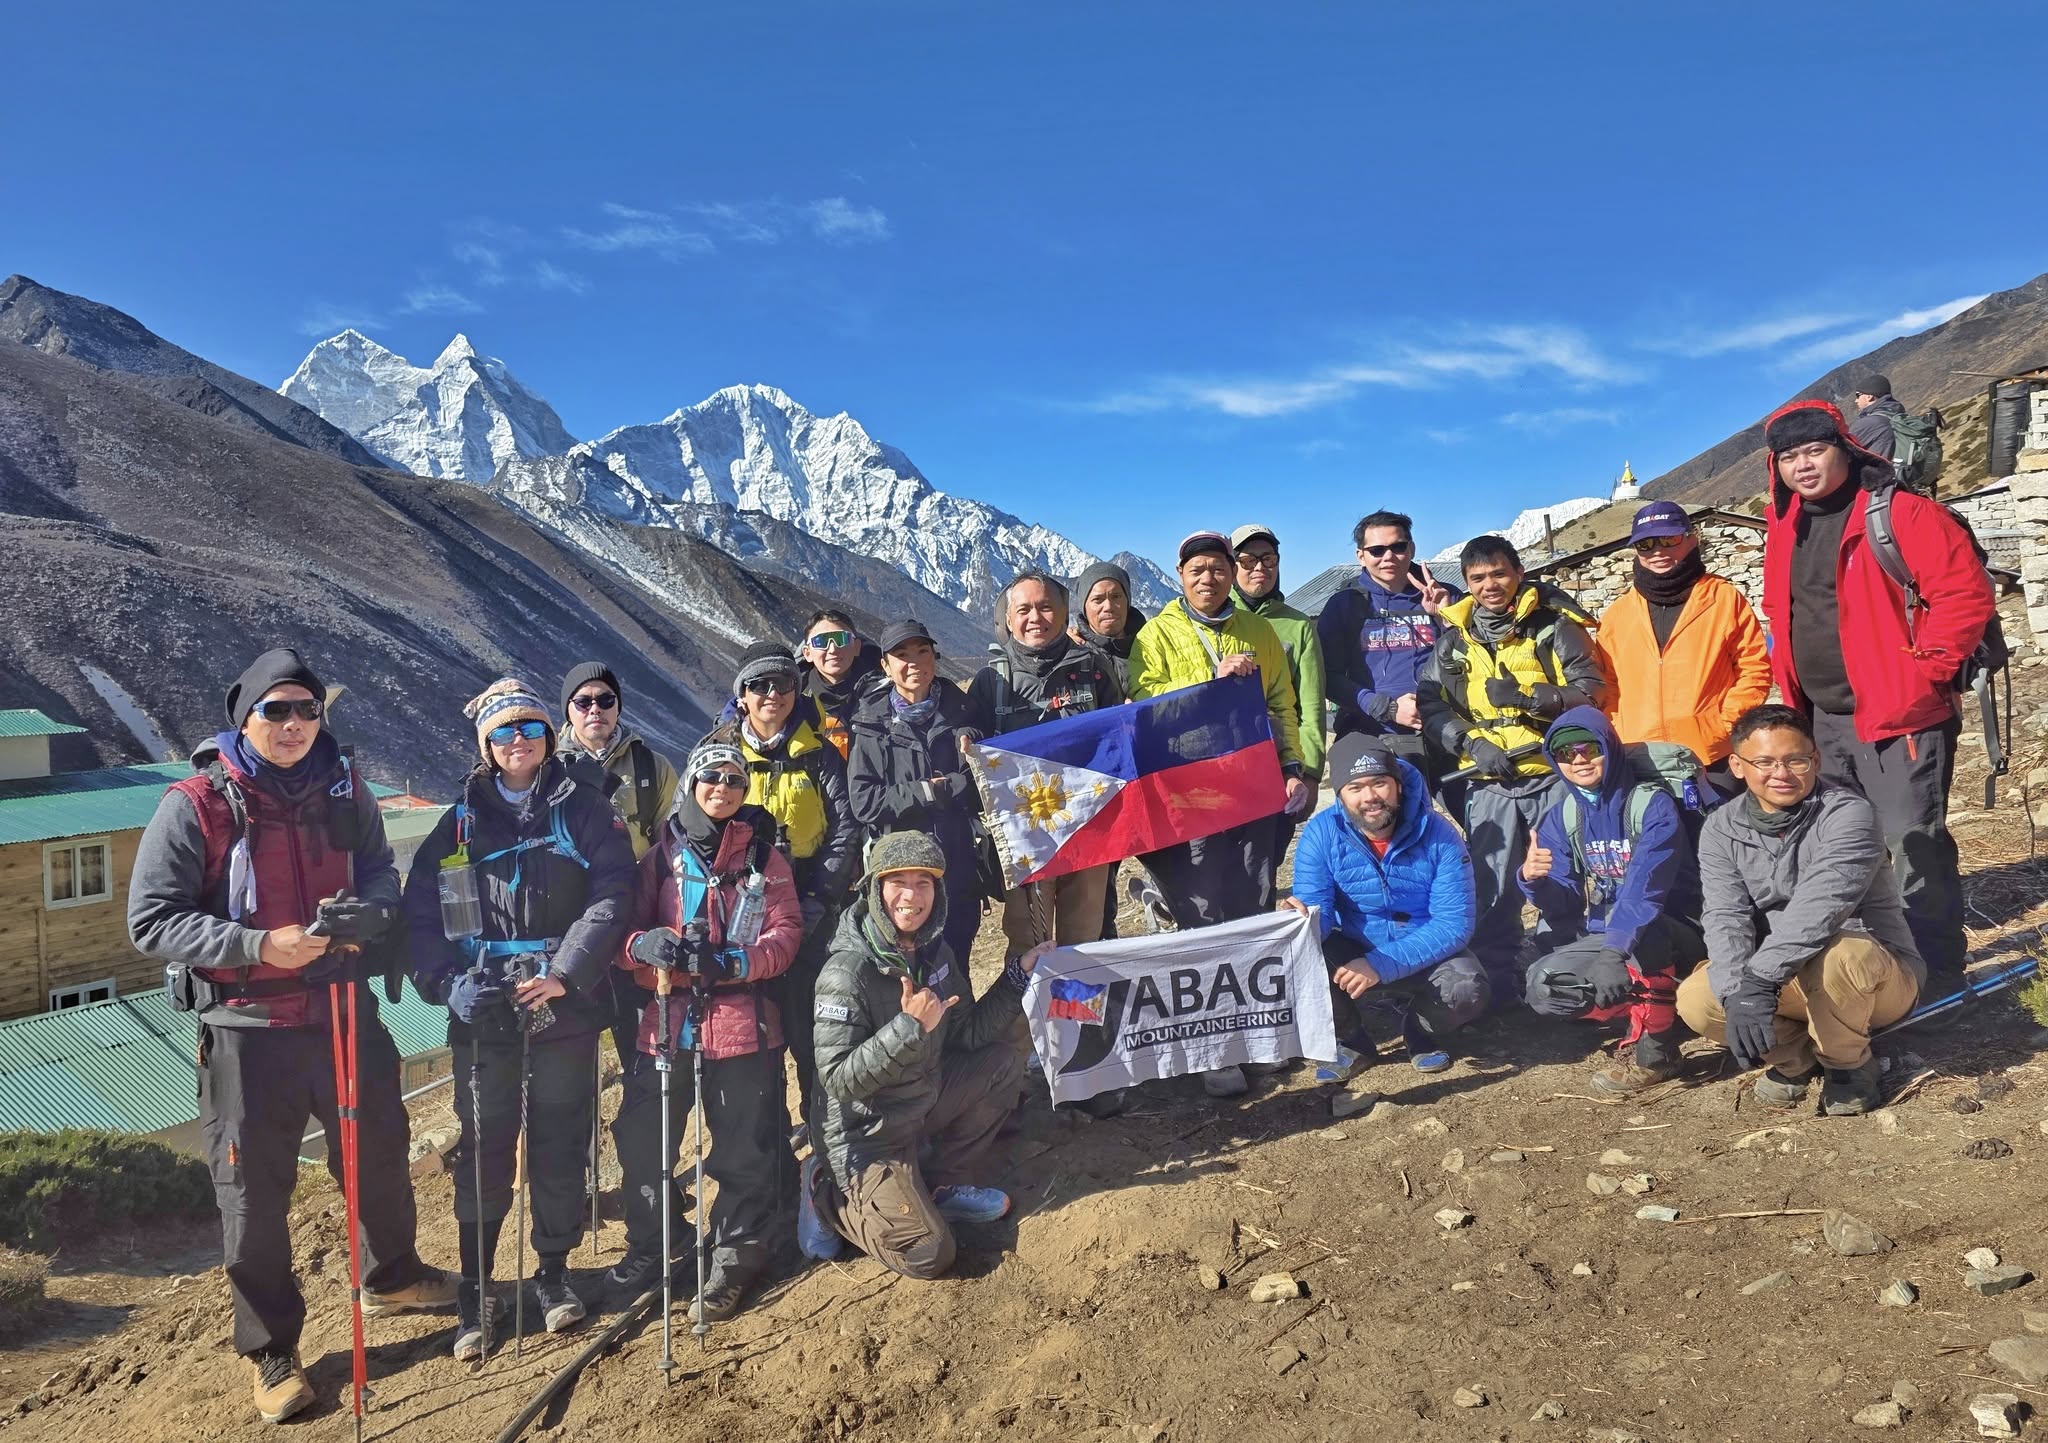
What made the journey even more special were the people I met along the way. Fellow hikers from all over the world, kind locals, and Sherpa guides and porters who knew the mountains like the back of their hands. There was a shared sense of purpose and adventure that made every moment unforgettable.
Reaching Everest Base Camp was more than just crossing something off my bucket list. It was a dream come true, a personal victory, and an experience I’ll carry with me for the rest of my life. Without a doubt, this has been one of the greatest adventures I’ve ever had.
What is in this blog?
I’ll be covering the first part of the expedition in this guide, with a more detailed look at the itinerary in upcoming blogs. I’m also launching a YouTube channel specifically for this Everest Base Camp trek and my other adventures, so I’m really excited! It’s going to be a lot of fun sharing the journey with you.
Here’s a preview of what you can expect in this post:
1. Location of Everest Base Camp
2. Cost and Budget Overview for the Expedition
3. A Brief History of Everest Base Camp
4. Best Time of Year to Visit
5. Essential Packing List for the Trek
6. Preparation for the Hike
7. Accommodation Options Along the Trail
8. What to Expect When It Comes to Food
9. How to Reach Everest Base Camp
10. Altitude Sickness
11. Summary of the Itinerary
12. Trip Highlights and Personal Favorite Moments
13. Frequently Asked Questions (FAQs)
Location of the Everest Base Camp
Most people are surprised to learn that there are actually two Everest Base Camps—one on the northern side of the mountain in Tibet, and the other on the southern side in Nepal. While both serve as launching points for climbers attempting to summit Everest, the South Base Camp in Nepal is by far the more popular destination for trekkers.
Located in the heart of the Khumbu region, this base camp is the final stop for the famous Everest Base Camp trek. It’s the version that adventurers from around the world dream about and the one most commonly featured in documentaries, photos, and travel stories.
The journey to the camp winds through deep valleys and past ancient villages, eventually following a path that splits at the high-altitude Sherpa village of Dingboche. From there, the trail pushes onward into the remote upper reaches of the Himalayas, ending at Everest Base Camp—perched at an awe-inspiring altitude of 17,598 feet (5,364 meters). Tucked beneath the looming shadow of Everest itself, the camp offers breathtaking views, a rich cultural backdrop, and the unforgettable experience of standing at the foot of the world’s highest mountain.
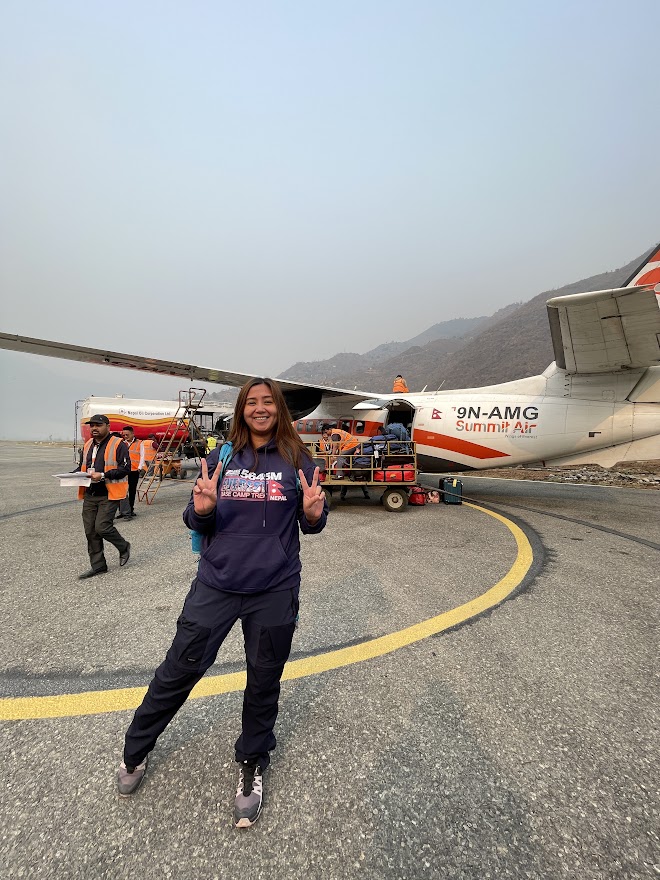
Expedition Costs and Budget Breakdown, Including Porter Services
I booked my Everest Base Camp Himalayan expedition through Yabag Mountaineering, a group I discovered on Facebook. After reaching out and inquiring about the details, I decided to join their organized trek. You can check out their Facebook page [here].
The total cost of the expedition was $1,600 USD, which was approximately ₱93,200 at the exchange rate of $1 = ₱58.25 back in November 2024. I booked my slot in November and only needed to pay a $500 USD down payment to secure it. The remaining balance is due on the day of the trek, and it must be paid in USD only.
If you don’t have a USD account for the down payment, you can pay in Philippine Pesos. However, the amount will be converted based on the exchange rate on the day you transfer the payment. I chose this option for the down payment, but I paid the remaining balance in USD. To do so, I exchanged my Philippine Pesos for US dollars when I first arrived in Singapore.
To note:
1. The reservation fee is non-refundable, but it can be transferred to another person for the same event schedule. However, please note that additional charges may apply for the transfer.
2. An additional $150 USD tipping fee per person is expected after the trek, on top of the $1,600 USD expedition cost. It’s recommended to give the tip in USD, if possible. I personally only had $100 USD at the time, so I covered the remaining $50 USD in Nepalese Rupees, which amounted to 6,822 NPR.
3. According to current Nepal tourism regulations, each porter is allowed to carry a maximum of 30 kg, typically shared between two trekkers. This means each trekker should limit their luggage to no more than 15 kg to stay within the allowed weight and to ensure the load remains manageable for the porter.
4. It’s worth noting that helicopter services are available on the Everest Base Camp trek for specific situations, such as descending after reaching base camp or handling flight delays at Lukla or Ramechhap Airport. If you’re flying solo, the cost is approximately $2,500 USD. However, if you share the ride with a group of up to five people (including yourself), the cost can drop significantly to around $500 USD per person, making it a more affordable and convenient option.
5. You can hire a horse to ride between villages if the trek becomes too tough. Just note that the cost is $250 for each village you pass through—so a longer route with multiple villages will cost more.
Cost Inclusions and Exclusions below:
A Brief History of Everest Base Camp
The serious efforts to climb Mount Everest began in the early 1920s, when a British expedition, led by George Mallory and Andrew Irvine, aimed to map the northern face of the mountain. Mallory, who is believed by some to have been the first to reach the summit, along with his team, made attempts to climb, but they never established a permanent base camp—an aspect of their expeditions that remains shrouded in mystery. Furthermore, after China’s invasion of Tibet in 1949, the northern route became largely inaccessible, effectively closing off this path for future expeditions.
It wasn’t until the legendary 1953 expedition led by Sir Edmund Hillary and Tenzing Norgay that the mountain was successfully conquered. This historic achievement took place on the southern slopes in Nepal, where Hillary and Norgay realized the importance of establishing a base camp. Instead of making long treks through the Khumbu Valley each time they needed supplies, they decided to set up a permanent station at the base of the mountain. This practical decision ultimately led to the creation of Everest Base Camp, the launching point for most modern-day expeditions and trekkers to Everest.
Best Time of Year to Visit
There are two primary trekking seasons for Everest Base Camp in Nepal: spring (from late March to May) and autumn (from late September to November). These peak seasons fall just before and after the monsoon, providing drier conditions and clearer skies with minimal rainfall. However, it’s important to remember that while precipitation is less common during these times, zero rain can never be guaranteed at such high altitudes.
I trekked during the spring season, but due to the high altitudes, it snowed on a few days as I made my way to Everest Base Camp.
Essential Packing List for the Trek
When planning what to pack for your Everest Base Camp trek, it’s important to keep in mind the strict weight limits imposed on the flight from Kathmandu to Lukla. Additionally, there are also weight and size restrictions for the bags carried by porters throughout the trek. Because of these limitations, you’ll need to pack strategically and bring only the essentials for this once-in-a-lifetime adventure.
1As a general rule, your main backpack should weigh between 10 to 15 kilograms. In addition, it’s a good idea to bring a small daypack—around 30 liters in size (I use a 32L from The North Face)—to carry my daily hiking essentials like water, snacks, extra clothing layers, and personal items.
2. Sunglass/shades – For high-altitude treks like Everest Base Camp, it’s essential to wear glacier glasses with 100% UV protection and side shields to guard against snow blindness, which can result from strong UV rays at elevation. Regular sunglasses won’t provide sufficient protection. If you use prescription eyewear, consider asking your doctor about prescription glacier glasses, preferably with transitional lenses. Make sure to store them in a hard case to avoid damage. I personally bought mine for ₱3,000, and they worked perfectly—I still use them for other mountain treks.
3. Sleeping bag (provided by the organizer) – All the teahouse accommodations provide comforters, so if you’re comfortable with the cold, you might not need a sleeping bag. However, I personally found my sleeping bag indispensable—I used it from the very first night until the end of the trek, and it made a big difference in ensuring a restful sleep.
4. Duffel or porter bag (provided by the organizer) – This was really helpful because I was able to store other items, like extra jackets and anything else I might need during the trek.
5. 4 seasons jacket (provided by the organizer) – I find the 4 seasons jacket to be very useful especially nearing the Everest Base Camp because it was really cold dropping to -15 degree Celsius.
6. Northface Downjacket and windbreaker jacket – I’ve been using my North Face down jacket and windbreaker jacket since 2020, and after 5 years, they still haven’t let me down. Depending on the weather, I sometimes wear just the down jacket or combine both for extra warmth. I highly recommend pairing a down jacket with headgear for added protection. My windbreaker jacket has only headgear.
7. Bonnet or thermal headwear (locally made) – I found this extremely useful, especially during the last few days when the cold and wind started giving me headaches.Hat/Cap – During the initial days of the trek, the sun can be quite intense, so bringing a cap or hat is essential to keep your head cool and protected from the heat.
8. Naturehike Gloves – I purchased Naturehike waterproof gloves 3 pairs.
9. Naturehike Trekking Poles – These trekking poles were incredibly helpful throughout the entire hike. They provided much-needed support, especially on the steeper sections and rough terrain. With each step, they helped take some of the pressure off my knees and offered balance when navigating uneven paths. Overall, they were a crucial part of my gear that made the journey much more manageable
10. Naturehike thermal socks (3 pairs) – These are essential for keeping your feet warm in cold weather and providing protection during the trek. They help prevent discomfort and potential frostbite, ensuring your feet stay dry and insulated throughout the journey.
11. Uniqlo heattech tshirts and pants (3 pairs) – for added warmth for the cold weather
12. Nature hike pants 2pcs
13. Raincoat – Since rain tends to be intermittent during the hike, it’s advisable to have both an upper and lower raincoat for protection. It’s also a good idea to cover your bag to keep it dry. If you forget, you can purchase a rain cover for your bag along the trek for an additional cost.
14. Undergarments – To be honest, I packed more undergarments than shirts for the trek. Doing laundry in the mountains is challenging and quite expensive, as you have to pay per item (shirt or undergarment), unlike in the Philippines or other countries where laundry is typically charged by weight.
15. Toiletries – Wet and dry tissue, sanitary pad, shampoo, soap and other essentials you may need for the expedition.
16. Medications like vitamins, ibuprofen, paracetamol, and electrolyte powders or energy drinks are essential to bring. Throughout the trek, I consistently took my daily vitamins and also used acetazolamide to help prevent altitude sickness.
17. powerbank -Some teahouses don’t have electrical outlets in the rooms, so it’s a good idea to keep your power bank fully charged at all times. That way, you’ll still be able to use your phone when needed, especially in areas where charging options are limited or come with an extra fee.
18. Salomon Hiking Shoes – I’ve been thoroughly impressed with Salomon hiking shoes. From the moment I started using them, I noticed a remarkable difference in comfort and support. I’ve never experienced any soreness, even after long treks, which speaks volumes about their design and cushioning. The fit is spot on—the size I ordered feels just right, providing a snug yet breathable feel that enhances stability on various terrains. Salomon has truly exceeded my expectations in terms of quality, performance, and durability. I can confidently say this brand has earned my trust, and I would highly recommend their hiking shoes to anyone looking for reliable, high-performance footwear for outdoor adventures.
19. Other essentials like pocket money and your passport should be stored in a waterproof pouch or bag for protection. Keep in mind that ATMs are only available up to Namche Bazaar—beyond that, you’ll need to rely on cash. Many shops along the trail accept credit or debit cards, but they usually add a 10% service charge. It’s best to withdraw a larger amount of cash before heading higher. Also, the higher you go, the more expensive basic items like drinks, toiletries, snacks, and food become in the teahouses.
Preparation for the Hike
While I personally didn’t undergo formal training before hiking to Everest Base Camp, I don’t recommend taking the same approach. Proper preparation can make a significant difference in your experience and safety. I strongly encourage you to do your own training—whether that’s regular hikes in the Philippines or anywhere else with challenging terrain and elevation.
It’s also wise to consult your doctor to ensure you’re physically fit to handle high-altitude conditions. Remember, trekking to EBC is a serious adventure, and nature has a powerful way of reminding us of our limits. Respect the mountain, prepare well, and give yourself the best chance to enjoy the journey safely.
Accommodation Options Along the Trail
The majority of your accommodations along the Everest Base Camp (EBC) trekking route will be in teahouses. Despite what the name might suggest, teahouses are not just simple rest stops for tea—they are basic guesthouses or bed-and-breakfast-style lodges that cater specifically to trekkers.
Teahouses along the EBC trail are generally modest but clean and functional, providing the essential comforts needed after a long day of hiking. Early in the trek—especially in villages like Phakding or Namche Bazaar—you’ll find more well-equipped and larger teahouses with slightly better facilities and supplies like private bathroom. As you ascend and move into more remote areas, accommodations tend to get simpler and more rustic.
The rooms are typically basic, often with wood-paneled or plaster walls, a single window, and twin low-rise beds topped with foam mattresses. Bedding is provided, but you’ll want to bring your own sleeping bag for added warmth. Some rooms might offer in-room heating, though more commonly, teahouses rely on a central stove in the dining area to provide warmth, usually lit only in the evenings.
While a few teahouses offer hot showers, most have cold showers only, especially at higher altitudes. Electricity is generally available, but charging your devices may come with an additional fee, and power supply can be unreliable. Wi-Fi is available in certain areas, though the connection can be spotty and isn’t always guaranteed. Access typically comes at an extra cost—around 1,500 NPR or 600–700 PHP for 10GB of data.
In short, teahouses provide a simple but welcoming environment that allows you to rest, eat, and recharge—both physically and mentally—before continuing on your trek to Everest Base Camp.
What to Expect When It Comes to Food
Fortunately, most teahouses along the Everest Base Camp (EBC) trail offer a fairly satisfying selection of meals to help you refuel after long hours of trekking. While the options may not be fancy, they’re hearty, warm, and exactly what you need to keep your energy up in the mountains. One thing to note is that menus across teahouses tend to be very similar, even though the quality and taste of the food can vary depending on the individual chef at each stop.
Here are some of the most common dishes you’ll see in the menus in the teahouses and along the route:
- Dal Bhat – Perhaps the most iconic meal on the trail, dal bhat is a staple in Nepalese cuisine and a favorite among trekkers. This nutritious dish features spiced lentil soup, typically served with a generous portion of steamed rice, vegetables, and chapati or papad. Many teahouses even offer free refills, making it a great option for hungry hikers.
- Egg and potatoes– This is a filling comfort meal often chosen by those needing a calorie boost. It usually includes a double-egg omelette or fried eggs, served alongside hand-cut potato fries. It’s simple but satisfying.
- Momos – These traditional Tibetan-Nepali dumplings are a beloved staple throughout the region. Available in both steamed and fried versions, they’re typically filled with either vegetables or meat, depending on what’s available at different elevations along the Himalayas. The ingredients and style may vary from village to village, but no matter where you try them, momos are always a warm, satisfying treat after a day of trekking.
- Vegetable fried rice/meat fried rice – Chicken fried rice is a popular, comforting dish along the Everest Base Camp trek. It’s typically made with rice, vegetables, egg, and chicken, providing a satisfying meal after a long hike. While the quality of chicken varies depending on your altitude, it’s always a great way to refuel in the warm teahouses, especially after a chilly day on the trail.
- Shyakpa (Sherpa Stew) – A traditional Sherpa favorite, this dish is a vegetarian stew made from a clear or mildly spiced broth filled with potatoes, carrots, radish, and other local root vegetables. It’s a warming and hearty option, especially great for colder days.
- Pizza and pasta– Surprisingly, many teahouses attempt to serve pizza and pasta to cater to Western/Asian palates. While not quite like what you’d find in Kathmandu, some are quite decent considering the limited ingredients and high altitude. It’s always a bit of a gamble, but often a welcome change from rice-based meals.
- Meat – As you ascend to higher altitudes, don’t be surprised if meat disappears from the menu. Due to logistical challenges and lack of proper refrigeration, transporting and safely storing meat becomes increasingly difficult in remote, high-altitude villages. For hygiene and safety reasons, most teahouses opt to offer vegetarian meals instead.
- When it comes to drinks, common options include honey ginger tea, lemon tea, coffee, and various sodas. Among these, honey ginger tea is a favorite among trekkers—it’s warm, soothing, and offers a refreshing boost that’s perfect for the cold mountain climate.
Keep in mind that you can either purchase mineral water at the teahouses or refill your bottle from their taps. The organizer also provides purified water drops to ensure the water is safe to drink.
Overall, while the food on the EBC trek is basic, it’s prepared with care and designed to meet the energy demands of high-altitude trekking. Just remember, the higher you go, the more expensive meals become, due to the logistical challenges of getting supplies to remote locations.
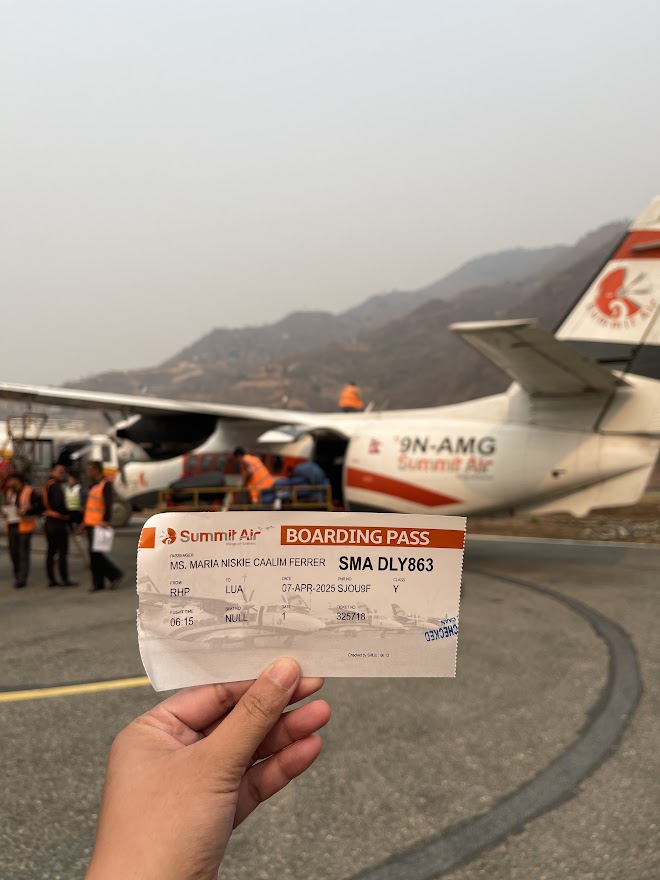
How to Reach Everest Base Camp
Getting to the start of the EBC trek is an adventure on its own. You’ll first fly into Kathmandu, Nepal’s lively capital, known for its UNESCO temples and spice-filled streets. It’s best to arrive a few days early—not for altitude adjustment, since it’s only at 1,372m (4,500 ft)—but to get a feel for the local culture and pace before heading into the mountains.
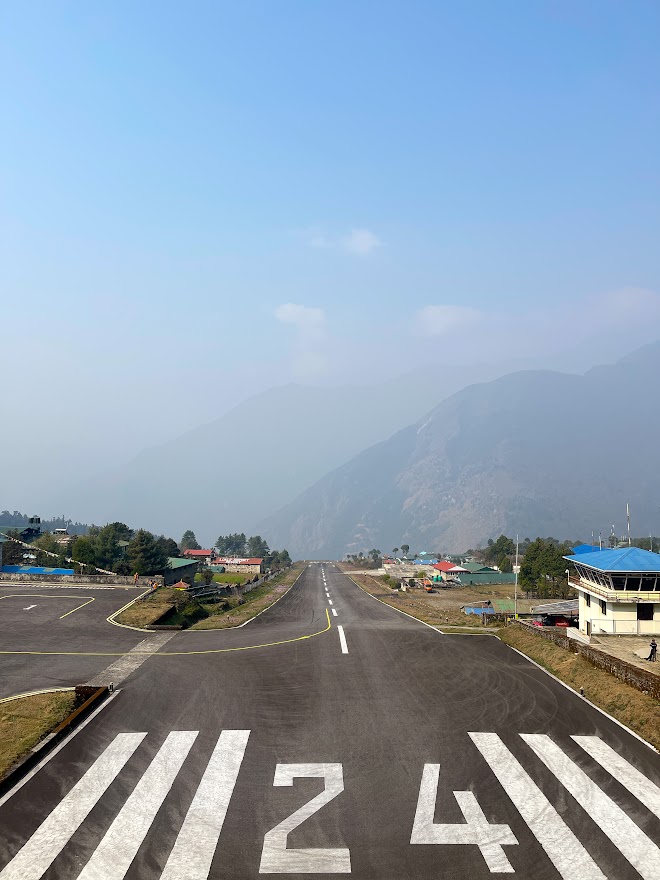
After your stay in Kathmandu, the next part of your journey to Everest Base Camp kicks off with a rough six-hour drive to Ramechhap Airport. This ride takes you through winding roads and rugged mountain terrain, providing an adventure of its own. The roads are bumpy and at times challenging, but it offers a unique glimpse into Nepal’s rural landscapes.
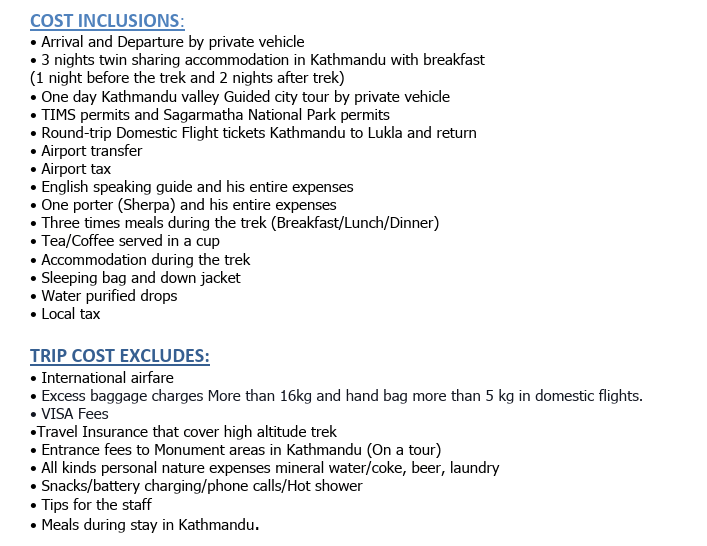
Upon arriving in Ramechhap, assuming there are no delays, you’ll board a small plane for the final stretch of your journey. The 15-20minutes flight to Lukla is an exhilarating experience. Known as one of the most dangerous airports in the world, Tenzing-Hillary Airport in Lukla is perched on a steep mountain plateau at an altitude of 9,300 feet. The real thrill comes during the descent, as the narrow runway and dramatic surroundings make for a heart-pounding landing.
Altitude Sickness
While we may sometimes defy the odds and push our bodies beyond what science predicts, it’s still important to stay informed about the potential risks and worst-case scenarios that can come with our bold outdoor adventures.
Altitude sickness can affect anyone, but it’s especially important for those who live at sea level to take it seriously. Symptoms typically start to appear at elevations above 3,500 meters (11,500 feet), though individual reactions can vary widely. Not everyone will experience the same symptoms, and their intensity can differ from person to person.
Common signs of altitude sickness include:
- Shortness of breath
- Rapid breathing
- Nausea
- Vomiting
- Dizziness or lightheadedness
- Weakness or fatigue
- Difficulty sleeping
- Loss of appetite
Being aware of these symptoms and how your body responds to altitude is key to staying safe and enjoying your high-altitude adventures. If left untreated, altitude sickness can become life-threatening. One of the primary causes is ascending too quickly without allowing the body enough time to acclimatize. Taking proper rest and recognizing early symptoms are essential steps to prevent serious complications at high altitudes.
Key Tip: Consider Taking Acetazolamide and Monitor Your Oxygen Levels
One effective precaution against altitude sickness is taking Acetazolamide, commonly known by the brand name Diamox, before your hike. The brand doesn’t matter—as long as the active ingredient is Acetazolamide, you’re good to go.
During our trek, we took it as a preventive measure, and it made a noticeable difference. Unfortunately, one of our teammates chose not to take it and developed Acute Mountain Sickness (AMS). As we approached Everest Base Camp, his oxygen levels dropped critically low—to just 30%—and he had to be airlifted for emergency medical attention.
This serves as a strong reminder: don’t underestimate the altitude. Prepare in advance, monitor your oxygen levels regularly, and listen to your body.
| Altitude | Expected Healthy O₂ Level |
|---|---|
| Below 1,350m | 90–95% |
| Up to 2,800m | 92–93% |
| Up to 3,400m | 85–90% |
| Up to 4,000m | 80–83% |
| Up to 5,000m | 75–80% |
| Up to 5,500m | 70–75% |
Summary of the Itinerary and Tips for the Trek
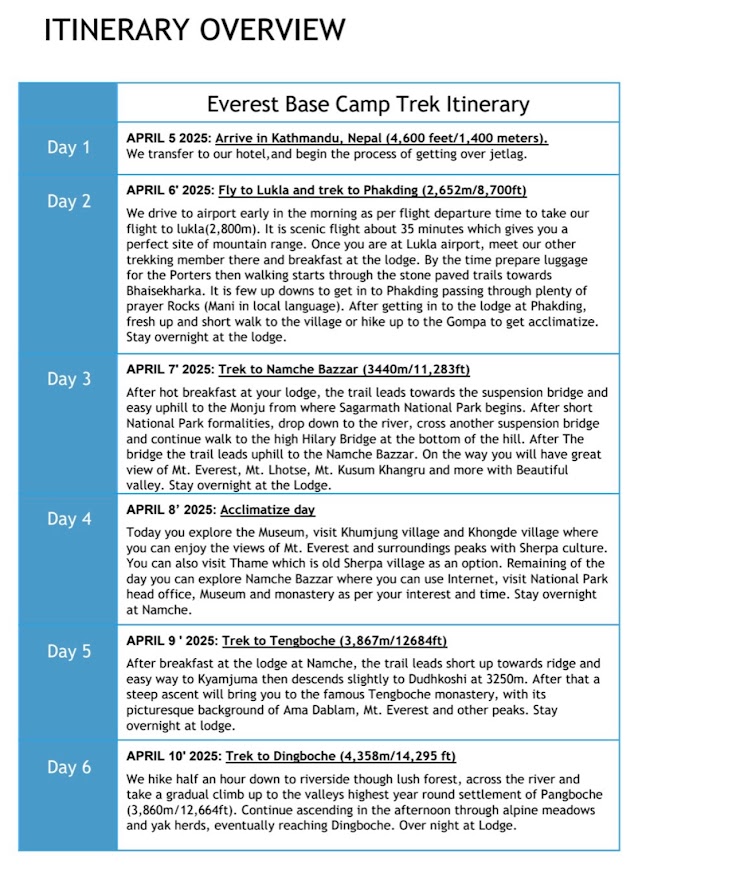
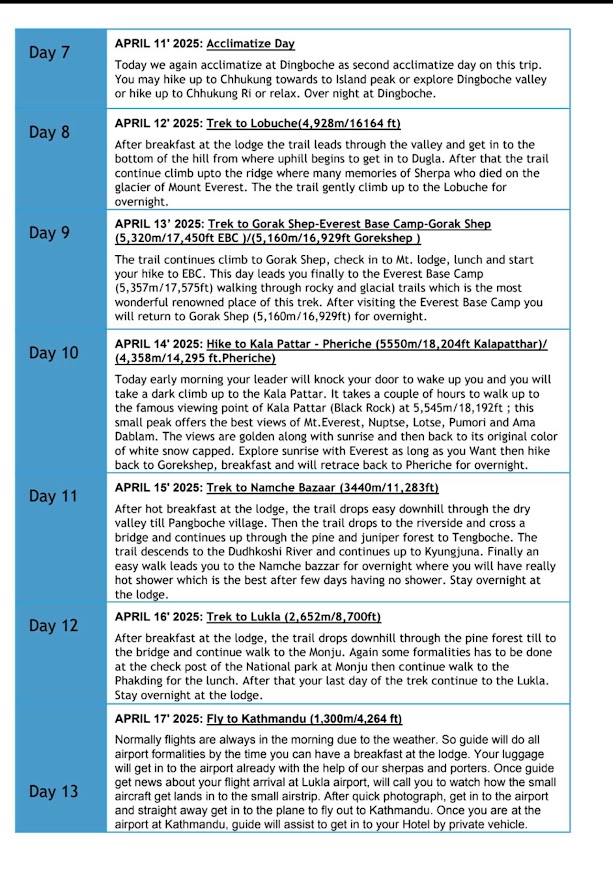
The itinerary shared above was provided by Yabag Mountaineering. I’ll be diving deeper into each day of the trek in my upcoming blogs. Stay tuned for more detailed insights!
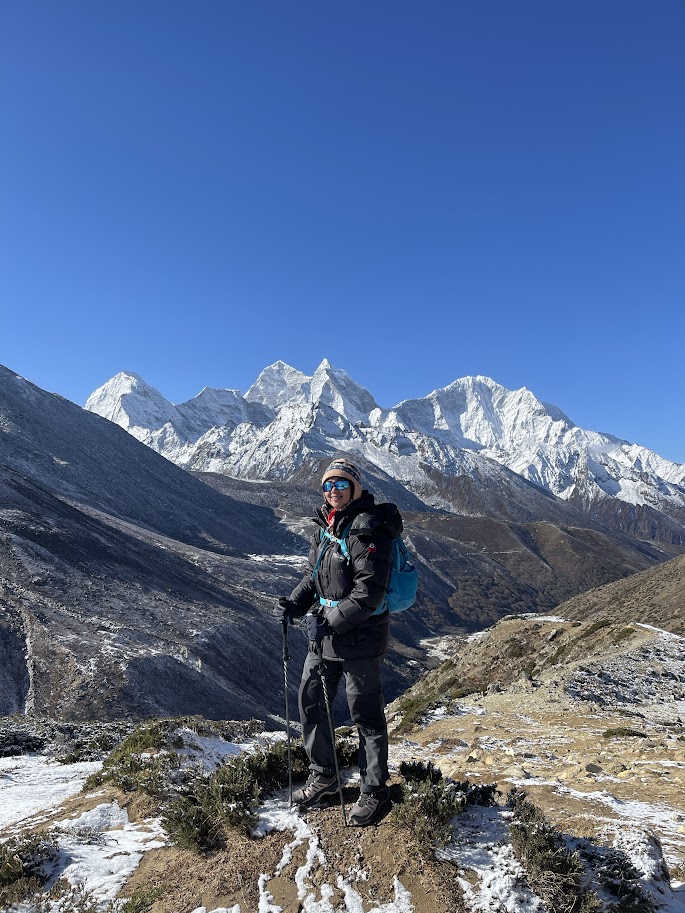
Trip Highlights and Personal Favorite Moments
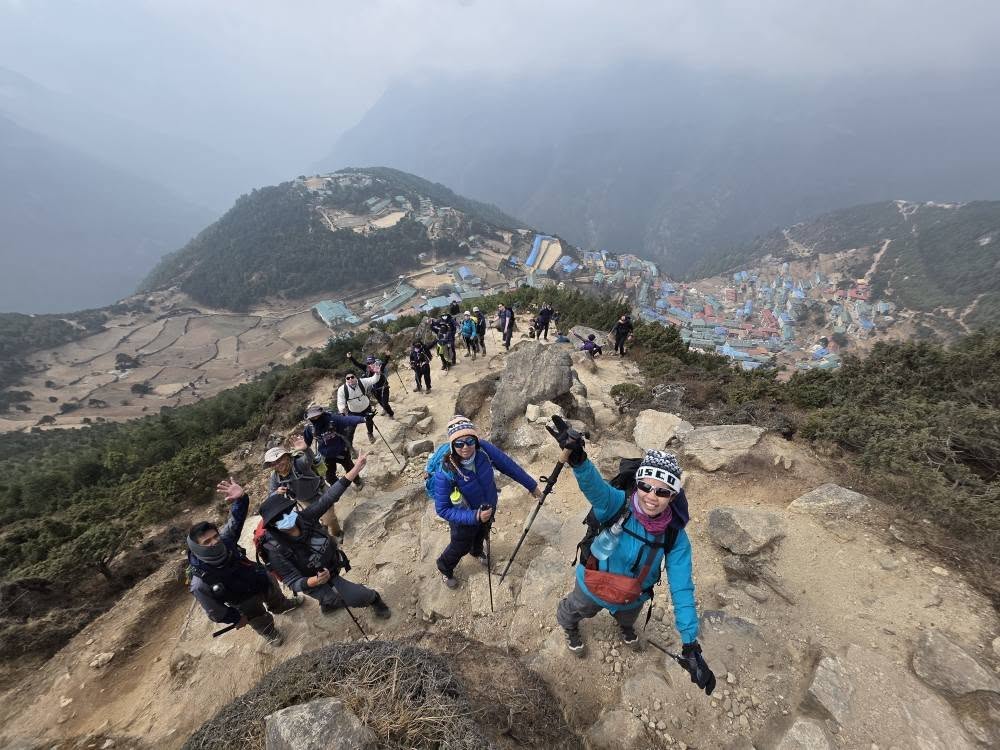
There are moments that take your breath away, and then there’s being in the presence of the Himalayas—a place so majestic, no photo or video could ever do it justice. It was like standing in front of nature’s most beautiful masterpiece, and I still find myself in awe just thinking about it.
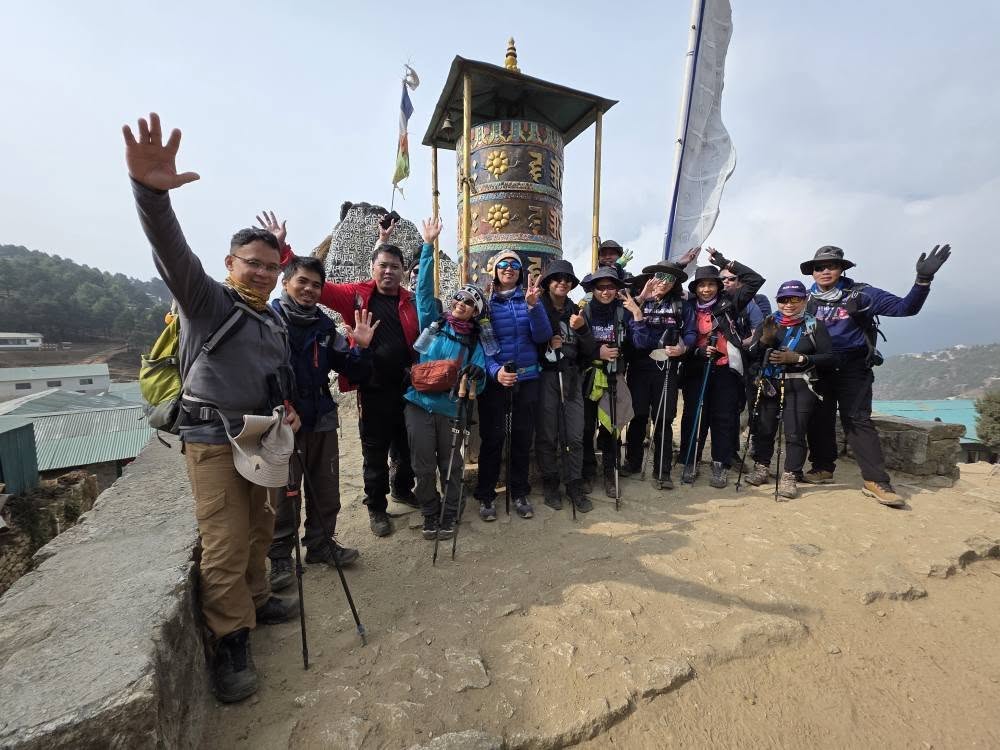
What truly caught me off guard wasn’t just the grandeur of the mountains—it was the profound, almost sacred sense of peace that enveloped me as I walked through those ancient, revered landscapes. Each day on the trail brought moments of quiet reflection, surrounded by symbols of deep spiritual meaning. The colorful prayer flags danced in the wind like whispered blessings, while the spinning prayer wheels turned with a steady rhythm that seemed to echo the heartbeat of the Himalayas. Ancient stones, carved with intricate mantras, lined the paths as silent guardians of tradition and faith.
There was something deeply humbling about it all. The vastness of the scenery made me feel incredibly small, yet never insignificant. With each step, I felt more grounded, more present—as if the act of walking itself became a form of meditation. The mountains didn’t just offer breathtaking views; they invited introspection, stillness, and a quiet connection to something far greater than myself. In that silence, I found a sense of clarity and belonging I didn’t even know I was searching for.
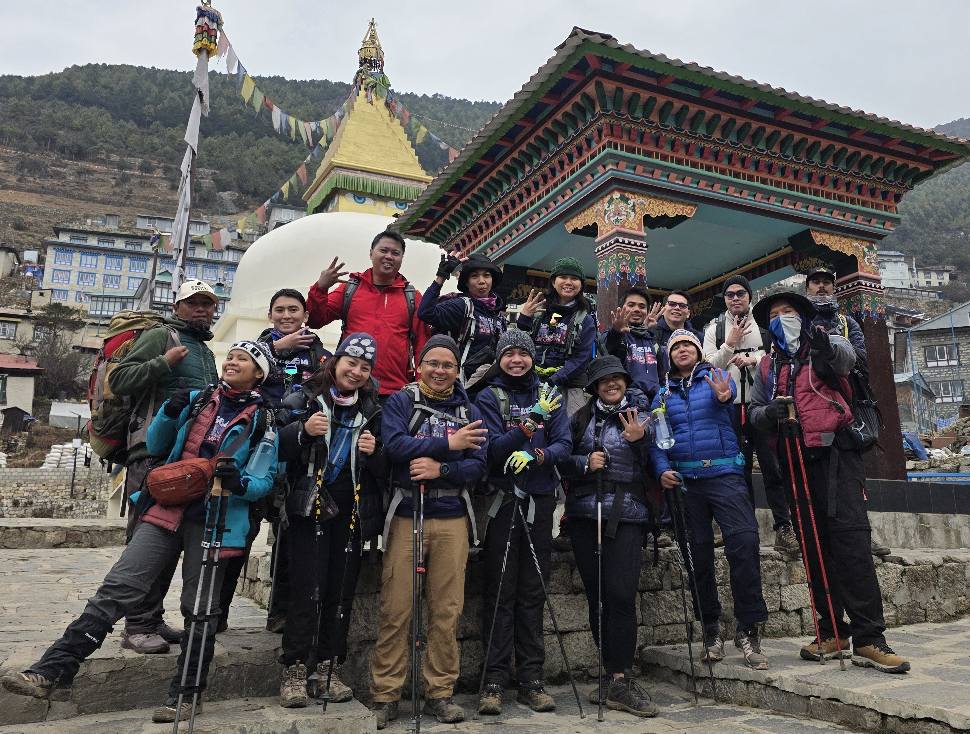
What made this adventure even more special were the people I met along the way. Sure, it was a tough trek, but the team—a group of strong and determined souls—helped push me to my limits and beyond, making the journey to Everest Base Camp not only possible but unforgettable. There’s something magical about sharing such an intense experience with others, knowing you’re all there for one goal: reaching the roof of the world.
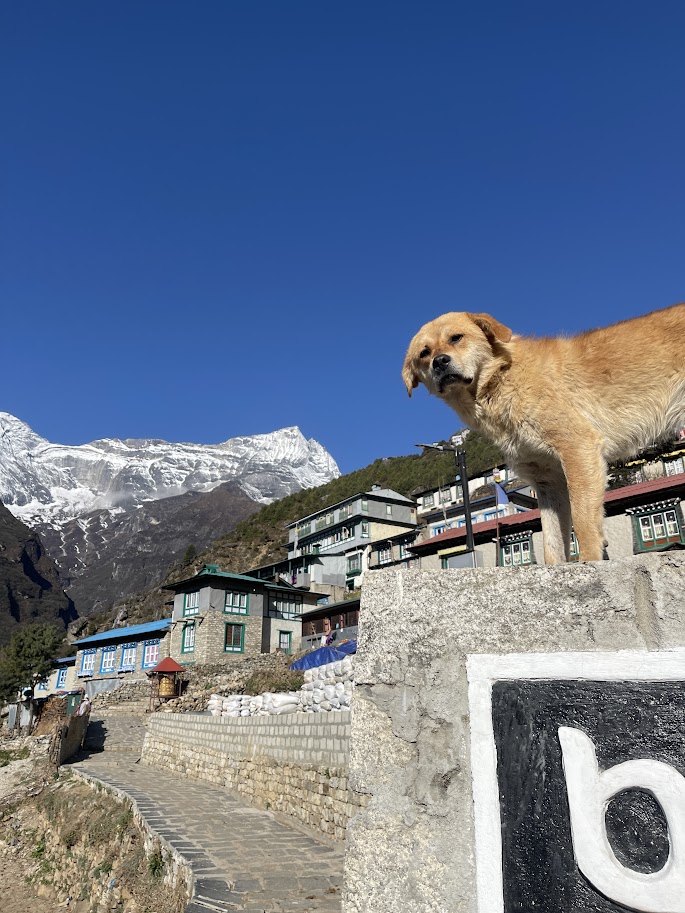
And then there were the animals—majestic and resilient trail companions that left an unforgettable mark on my journey. The mighty yaks, reliable buffaloes, Himalayan tahr, devoted mountain dogs, and the vibrant Himalayan lophophorus (the bird that inspired Kevin in Disney’s Up) were each a part of the living, breathing landscape of the Himalayas.
The yaks, buffaloes, and horses moved with quiet strength and grace along the rugged mountain trails, hauling heavy loads of food, supplies, and gear—making it possible for trekkers like us to continue forward in such remote and unforgiving terrain. Their presence wasn’t just practical; it was deeply symbolic of the harmony between humans and nature that defines life in the Himalayas.
They weren’t just part of the scenery—they were an integral part of the Everest Base Camp experience. The sound of their bells when they passed through the trails was a loyal companion throughout my hike, it became a comforting and constant soundtrack to my journey toward EBC. Their presence added a layer of authenticity and wonder to the trek, reminding me of how deeply connected every element in this environment is. They embodied the spirit of the Himalayas: strong, enduring, and beautiful in the most unexpected ways.
I also cannot thank the Sherpas and porters enough. Their expertise and kindness were a lifeline throughout the expedition. Without them, we wouldn’t have made it. And I must say, there’s something particularly special about having an Everest summiteer as our trip organizer. His experience and the way he trained us Filipinos made the trek feel all the more personal and meaningful.
One of the surprises I never expected were the teahouses perched high in the mountains—coffee shops, dessert spots, and cozy hideaways that felt like little treasures in the clouds. I was so thrilled to sip on coffee and nibble on fresh pastries at these high altitudes, marveling at how something so comforting could exist in such a remote, rugged place.
To this day, I remain speechless when I think of the Himalayas—the landscapes, the people, the animals, the teahouses—everything came together in a way that felt like a dream.
Conclusion
A heartfelt thank you to the Himalayan community. This journey has been a true revelation—one that reminded me that sometimes less is more. In a world where we often chase more, the simplicity and beauty of life here taught me to truly appreciate what surrounds me. The Himalayas, you will forever remain breathtaking, unmatched by any adventure I’ve experienced. You’ve earned a permanent place in the pages of my story, my collection of cherished memories.
Thank you for offering me the peace I didn’t know I needed, for giving me the clarity to understand what truly matters, and for helping me appreciate life more deeply than I ever thought possible. I never imagined such moments of awe would touch my soul in this way. I’m still overwhelmed, still in awe of everything this journey has given me.
Frequently Asked Questions
1.How difficult is the Everest Base Camp trek?
A: I’d rate it as moderate to difficult, depending on your fitness level and mindset. While the trek isn’t technically challenging—there’s no need for ropes or harnesses—the physical exertion is significant. I’ve completed the Asian Trilogy hikes, but Everest Base Camp was on another level in terms of endurance and fatigue. It truly felt like a full-fledged expedition. That said, I believe anyone with determination can do it—just be sure to train and prepare in advance. Good physical health and strong mental resilience are the key ingredients for success.
2. Is the trek covered by insurance? What type of insurance did you use?
A: I used Malayan Insurance, which I purchased through the GCash app. You can find more here. It includes coverage for helicopter evacuation in case you develop Altitude Mountain Sickness (AMS), which is a crucial benefit for high-altitude treks like this. However, be aware that the policy doesn’t cover activities involving specialized gear or equipment—such as those used in technical climbs or extreme sports. If you’re planning something more advanced, like summiting Everest, which requires mountaineering equipment, you’ll need a more specialized insurance policy. I recommend looking into providers that specifically offer coverage for high-risk or adventure travel.
3.Do I need a guide or can I trek to Everest Base Camp on my own?
A:While it’s technically possible to trek to Everest Base Camp without a guide, hiring one is highly recommended—and often required depending on the latest local regulations. Guides provide more than just navigation; they offer cultural insights, manage logistics, assist with permits, monitor your health at high altitudes, and ensure your overall safety.
4.Why is tipping necessary—can’t it be included in the trip cost? What’s the usual process?
Tipping is a common practice in Nepal and a way to personally thank your guides, porters, and crew for their hard work. It’s not included in the trip price because it’s meant to be a voluntary gesture of appreciation. Usually, the group pools their tips, and the leader distributes them fairly among the team at a final celebration—where everyone is recognized and thanked for their efforts.
5.What should I do if I experience altitude sickness?
A: If you start experiencing symptoms of altitude sickness (headache, nausea, dizziness), it’s crucial to stop and rest. Let your guide know immediately. If symptoms persist, you may need to descend to a lower altitude. Always follow the advice of your guide, and don’t push yourself to continue if you’re feeling unwell.
6. Are there any medical facilities along the trail?
A: There are basic medical facilities in the lower sections of the trek, especially in places like Namche Bazaar and Dingboche. However, they are limited and not equipped for serious emergencies. If you feel seriously ill, evacuation by helicopter might be required. It’s a good idea to carry a personal first-aid kit and to have travel insurance that covers emergencies.
7. Can I rent trekking gear in Kathmandu or Lukla?
A: Yes, you can easily rent trekking gear such as boots, jackets, sleeping bags, and trekking poles in Kathmandu or Lukla. The rental shops have a variety of equipment, but it’s still advisable to bring your own gear, especially for key items like boots and clothing, to ensure comfort and quality. Renting can be an affordable option if you don’t want to invest in new gear for a one-time trek. The organizer provided sleeping bag and extra down jacket for us that was an added benefit in the extreme weather during the ascent.
8. What’s the best way to prevent altitude sickness?
A: The key to preventing altitude sickness is gradual acclimatization. Spend extra days at intermediate elevations to give your body time to adjust. Stay hydrated, avoid alcohol, and don’t push yourself too hard. If you start experiencing symptoms, inform your guide right away and follow their guidance, including descending if needed. Our team also took acetazolamide before and during the trek to help manage any symptoms.
9. What happens if there is an emergency during the trek?
A: In the event of an emergency, your guide will coordinate a helicopter evacuation or arrange for you to be brought to a lower altitude. Most trekking agencies include emergency evacuation services in their packages, but it’s crucial to have insurance that covers such emergencies. Having a guide and reliable communication is vital for handling unexpected situations. In my experience with Yabag Mountaineering, the Malayan insurance covered the helicopter evacuation. When one of our teammates developed AMS, he was airlifted the following day after the organizer had prearranged the evacuation. It’s important to always inform your guide and organizer if you’re feeling unwell—some trekkers may hesitate to share symptoms. In our case, the guide and organizer had to intervene and arrange the evacuation because the trekker’s oxygen levels were dangerously low, and he was losing consciousness. Always keep your team in the loop for your safety.
10. Can I join the trek as a solo traveler?
A: Yes, I’m a solo travel who just joined an organized group from Yabag Mountaineering. +Joining a group can provide a supportive environment and reduce the risks associated with trekking alone, especially at high altitudes.
11. Are there any cultural customs or etiquette I should know about while trekking?
A: Yes, it’s important to be respectful of the local culture and customs in the Everest region. When greeting locals, a traditional “Namaste” is appropriate. Be mindful of the environment and avoid disturbing religious sites, such as stupas or monasteries. Dress modestly and remove your shoes when entering religious buildings. Always ask before taking photos of people, as some may prefer not to be photographed.
12. How much money should I bring with me on the trek?
A: It’s a good idea to bring cash for meals,snacks, and any unforeseen expenses along the trek. Prices tend to increase as you ascend. For example, toilet paper can cost around 250 PHP or 500 NPR. Based on my experience, it’s wise to have an extra 1000 PHP/day of the trek, though the amount will vary depending on your spending habits and whether you plan to buy souvenirs. While ATMs are available in Kathmandu, there are very few on the trail, with the only one being in Namche Bazaar. Some teahouses do accept cards, but they charge a 10% fee on top of your final bill.
13. How long does it take to complete the Everest Base Camp trek?
A: The Everest Base Camp trek usually takes about 14-16 days with the expedition group I joined, including buffer days and 2 days in Kathmandu. It’s advisable to have buffer days in case of flight delays to and from Lukla, which is common.
14. Do I need a visa to trek to Nepal?
A: Based on my experience, Filipino travelers can obtain a tourist visa on arrival at Kathmandu’s Tribhuvan International Airport. The visa is usually valid for 15, 30, or 90 days. Be sure to check the specific visa requirements for your nationality and have the necessary documents and fees ready before you travel.
More stories of Himalayan adventure here
With love from the heart of the Himalayas,
Maria — sometimes, Niskie

Leave a comment